Keyboard Maestro is extremely powerful, but sometimes it’s also really useful for simple things, too. Setting up TextExpander style functionality only requires a couple of steps.
The trigger
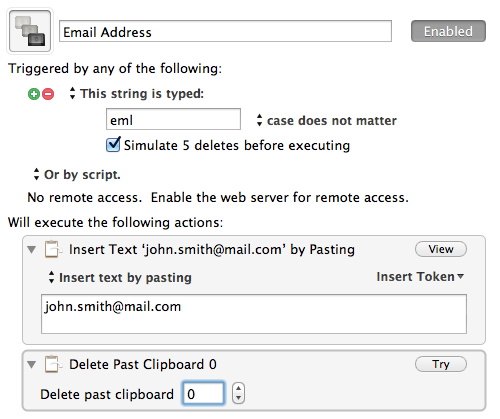
The first thing to do is set the trigger for the macro. From the New Trigger
dropdown, select Typed String Trigger. Then in the text box type the trigger
to expand. For example, for typing an email address a good trigger might be
eml.
The dropdown to the right of the text field works the same as the ‘case’
dropdown in TextExpander. Selecting case must match means that typing Eml
won’t match eml. Choosing case does not matter means that it will.
Finally, case affects actions would mean that if you capitalise the trigger,
the expansion will be capitalised.
The last thing to do is make sure that the checkbox
Simulate [X] deletes before executing is checked, otherwise the trigger phrase
won’t be deleted before the expansion is inserted.

The actions
There are only two actions required to turn the trigger into an expansion.
First, add an Insert Text action from the Text category. Leave the dropdown
set to Insert text by pasting, and type the expansion into the text area. The
Insert Token dropdown can be used to add all kinds of variables such as the
current date, the current iTunes track or the result of a calculation.

After setting up the expansion, add a Delete Past Cliboard action from the
Clipboard category. This is used because the Insert Text By Pasting action adds
the expansion to the clipboard, replacing anything previously copied. Change the
value to 0 (the default is 1) and the macro is done.

The end
Here's what the entire macro should look like:

Now in most applications typing the trigger will insert the text entered into the macro.